Removing / Replacing the Motor Hub
If you have determined through troubleshooting that the motor hub needs replacement or repair, the rear wheel will need to be removed from the bike.
Elevate Rear Wheel
Safety Note: Elevate rear wheel when troubleshooting the drive system.
When servicing the drive system, the first thing you always want to do is elevate the rear wheel.
- Slide a piece of wood under the cruiser just behind the kickstand.
- Lift the rear of the bike by the saddle horn and gently set it on the wood.
- Ensure the bike is stable. Make adjustments as necessary.
Disassembly Required
Remove Top Console and Tank Clams
If you haven't done this procedure before, please visit the 'Disassembly' section of this manual and then return to this point.
Remove the Rear Wheel
✔︎ Remove the plastic caps off the rear wheel axle nuts. The drive-side cap can't be removed so just move it out of the way.
✔︎ Remove the chain master-link and remove chain from rear sprocket.
✔︎ Remove zip-ties attaching motor cable to bike frame.
✔︎ Remove brake caliper. ⚠️ Note: Remove the caliper clamp bolts (frame), not caliper fixing bolts.
✔︎ Disconnect motor cable from motor controller - unplug modular connectors.
✔︎ Loosen rear wheel axle nuts and lower wheel to ground.
⚠️ The final step is a little tricky and it helps to have a second pair of hands. You have to lift the bike high enough to get the rear wheel out from under the rear fender. The bike will be heavy and unstable. Be careful!
✔︎ Lift the rear of the bike high and roll out the rear wheel assembly.

The area where the motor cable comes out of the axle shaft has sharp edges that can easily cut into the cable assembly and small wires within it. To help protect the cable from damage, unscrew the axle nut to that area and it will keep the cable more protected. Also, coil the long cable and tie it up with zip-ties.
Motor Hub Service vs. Replacement
Complete Hub Motor
Motor Hub Replacement
If you are replacing the motor hub, the new motor hub will need to be laced into the wheel. For those unfamiliar with the term 'laced', that means the spokes will need to be removed from the rim and re-installed with the new motor.
You can also choose to leave the aluminum hub laced into the wheel and replace only the motor assembly. See Motor Assembly-Only Replacement below.
Motor Assembly
Motor Hub Service
If you are servicing the rear motor such as replacing the integral clutch or composite gears, you will not need to separate the motor from the rim (i.e. remove spokes). The motor assembly will easily separate from hub (laced into wheel).
You most likely will need to use a gear puller to pull the clutch off the axle shaft, but from there its pretty straight forward.
Aluminum Hub
Motor Assembly-Only Replacement
Personally, I don't like de-lacing and re-lacing a wheel for a few reasons. One, it costs $100-110. Two, the wheel may not be as true as it currently is. Three, the de-lacing/re-lacing process can scratch the wheel.
This process involves ordering a new rear motor hub and removing the motor assembly from it. The new motor assembly simply replaces the old assembly while re-using the aluminum hub laced into your wheel.
Motor Hub Replacement
Replacing the motor hub requires specialized training, specifically as it relates to lacing and truing wheels. For those unfamiliar with the term 'truing', its the precise adjustment of spoke tension so the rim rotates true, without side-to-side variations. This procedure should only be done by a professional bike shop with experience in this area bicycle service.
Remove/Reinstall Hub Accessories
There are a number of parts that will need to be transferred to the new motor once replaced. Remove and reinstall these items on your new motor hub.
- Disc Brake Rotor
- Single Speed Gear Cog
- Freewheel Extenders (on Freewheel Hubs)
- Cassette Spacer Kit (on Cassette Hubs)
Protect your bike's finishes!
⚠️ Protect Your Rim's Finish: Fat Woody has gone to painstaking efforts to create a flawless finish on their cruisers. Removing and reinstalling spokes (especially thicker 13g spokes) can scratch your powder coated rims. Unfortunately, many technicians don't often invest the time to protect your finish.
When taking your wheel in for motor hub replacement, we suggest using blue painter's tape to cover as much of the face of the rim as possible. That said, don't put tape on the sides of the rim. The sides must left uncovered for truing. As the owner, INSIST they take care to not scratch your finishes.
⚠️ Re-Use the 13g Spokes: Insist they re-use your thicker 13g spokes. In the interest of minimizing labor time, many shops like to cut out the old spokes and sell you new ones (typically 14g thinner spokes). Your hub and rim are designed for 13g spokes and they are custom made for your high torque motor.
⚠️ Wipe Off Thread Lock Immediately: It is a common practice for shops to use a liquid thread-lock on the spoke nipples (where the spoke touches the rim). It's usually red or blue in color and if allowed to dry on your rim will NEVER come off.
Spoke Calculations
How a wheel is spoked is critical to its proper operation. Here at Fat Woody, we have tested numerous methods and determined the best possible spoke arrangement. It is important that the technician working on your wheel has this information.
Fat Woody has used both freewheel-type motor hubs, and cassette-type motor hubs. Each one is slightly different and has a different spoke calculation. Your local shop will easily know which type you have by looking at it.
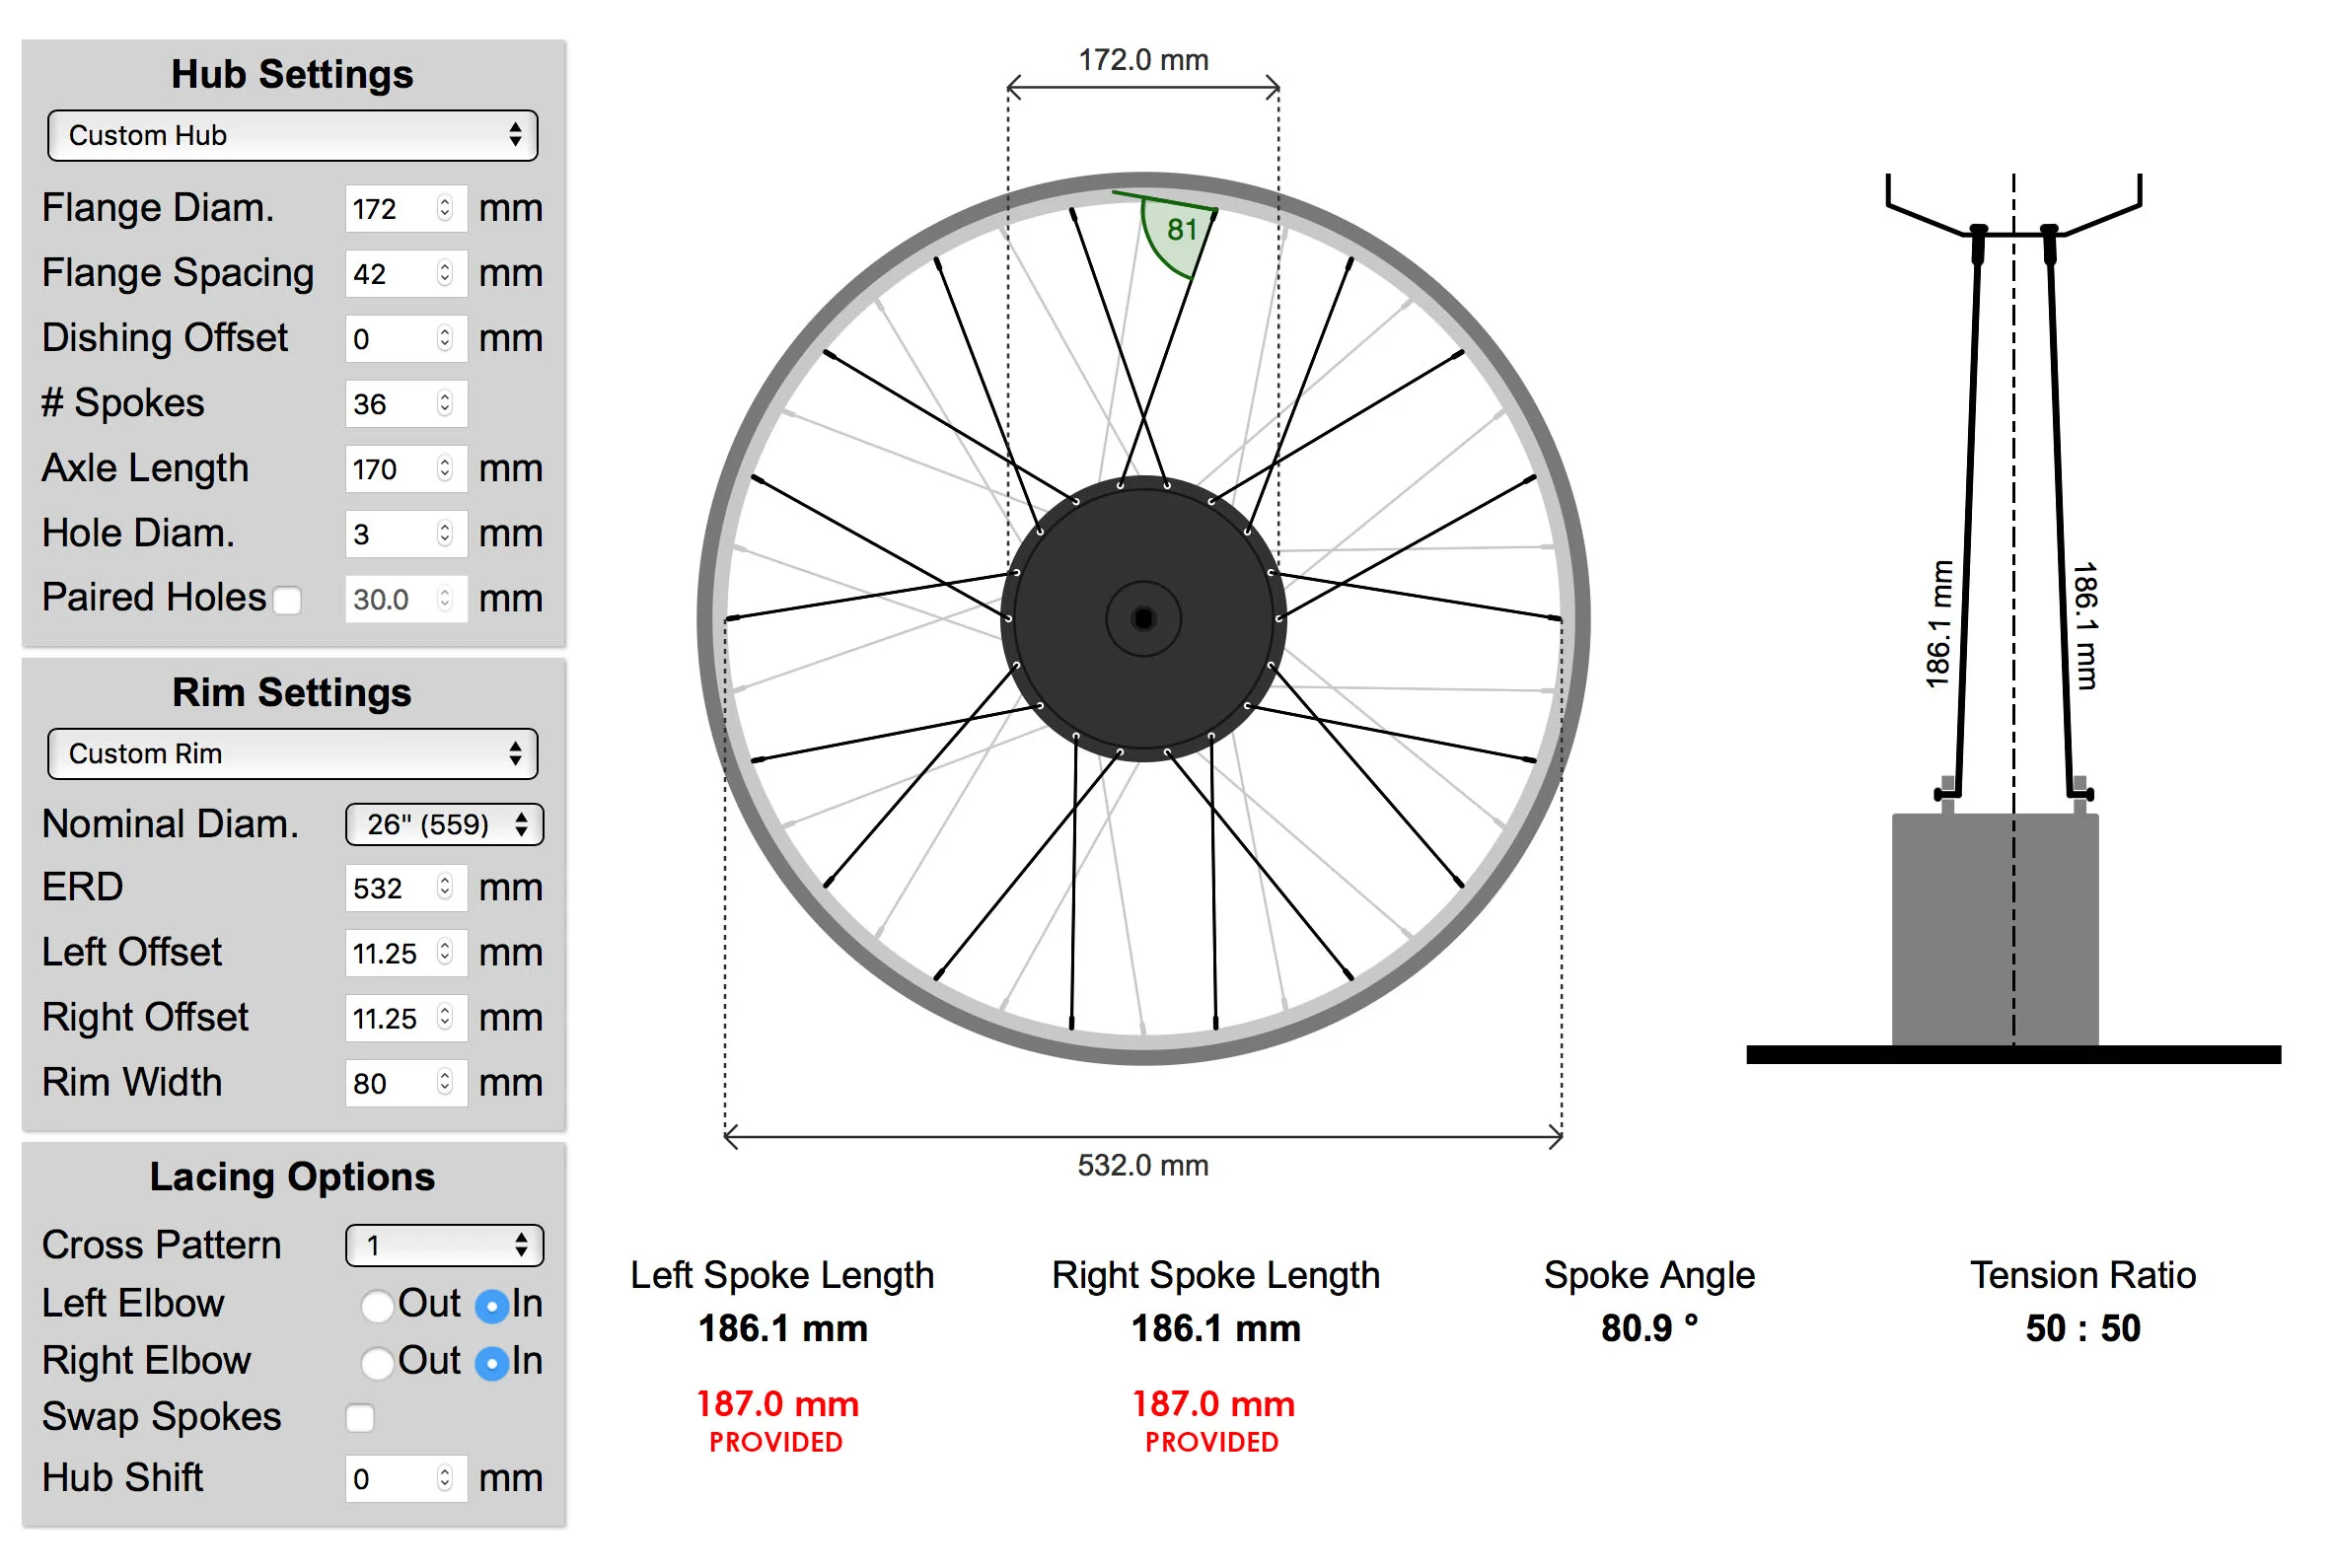
Freewheel Motor Hub - Spoke & Lacing Requirements
⚠️ Important Note: Because the Freewheel Motor Hub is offset and will require dishing, it is necessary to lace the wheel (spoke elbows) as shown.
Cassette Motor Hub - Spoke & Lacing Requirements